Create a list in SharePoint You can create SharePoint lists by using list templates, such as calendar and tasks, by...
Create a list in SharePoint
You can create SharePoint lists by using list templates, such as calendar and tasks, by importing spreadsheets, and by creating custom lists. Lists can include many kinds of data, ranging from text and dates, to calculations based on other columns. You can set alerts to get notifications or subscribe to an RSS feed for things that change.
To create or delete a list, you must have at least Designer permissions for the site. To delete a SharePoint list, see Delete a list in SharePoint.
Updated February 17, 2017 thanks to customer feedback.
Create a list on a SharePoint Online site
-
Click Settings
 and then click Site contents.
 -
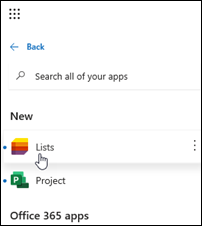
Click + New, and then click List.
-
Type a Name for the list, and optionally, type a Description.

The name appears at the top of the list in most views, becomes part of the web address for the list page, and appears in site navigation to help users find the list. You can change the name of a list, but the web address will remain the same.
If you want to create another type of list from a list template such as a task list, calendar, or time line, click App rather than list, then choose the app or list template in the Site Contents screen.
-
Click Create.
-
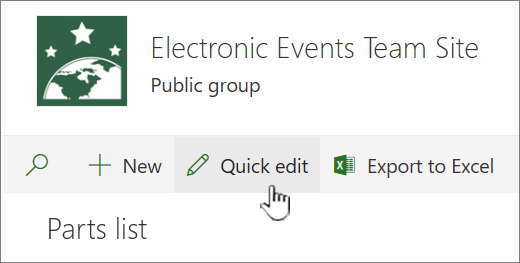
When your list opens, you can click Quick Edit to add the most commonly used columns for your content, or go to List settings to add any type of column.
For more info on adding columns, see Create or add a column in a SharePoint Online list or library .
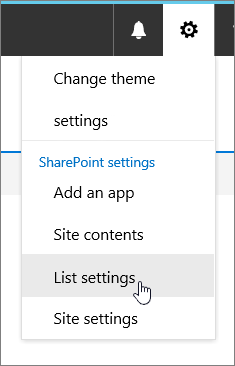
You can click Settings  and then List Settings to change properties, delete the list, add permissions, manage columns, and a number of other updates. See Edit a list for more info.
Create lists from other types of list templates
SharePoint Online lists can be used for more than a simple list. You can choose from list templates such as Links, Calendar, Survey, Issue Tracking, Announcements, and other. Here's how to create other types of lists.

-
Click Settings
 and then click Site contents.
 -
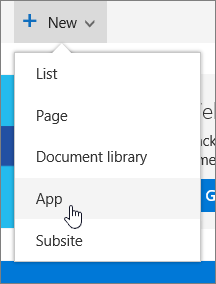
Click + New, and then click App.
-
If you don't see the type of list template or app you want, type it into the search box and pressing Enter. You'll get a list of all list templates that match.

Here are some of the list types you can search for
-
Calendar
-
Links
-
Announcements
-
Contacts
-
Promoted Links
-
Tasks
-
Issue Tracking
-
Custom List
-
Survey
For this example, we used calendar and chose the built-in calendar app for SharePoint Online. You may see other calendars that have been built within your company or offered by a third party.
-
-
Type a Name for the app you chose, such as Event calendar, July tasks, or Company Contacts.
The name appears at the top of the list in most views, becomes part of the web address for the list page, and appears in site navigation to help users find the list. You can change the name of a list, but the web address will remain the same.
-
SharePoint Online returns you to the Site contents page. Find the app you just created in the Site contents list and open it. SharePoint Online creates a default version of the app, calendar, task list, or whatever app you created.
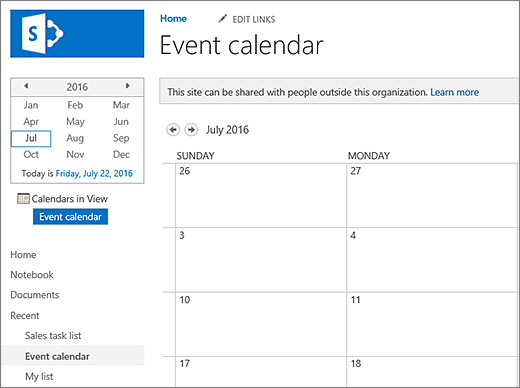
You can start entering data using +new task, edit this list, Add, or whatever way the specific app provides to add data.
Note: Some list based apps will display only in Classic SharePoint mode.
Depending on the type of app you choose, you can change the app's settings using List Settings or the List tab and ribbon at the top of the page. See Edit list settings in SharePoint Online for more information on settings.
Create a list in SharePoint Server 2016 or SharePoint Server 2013
-
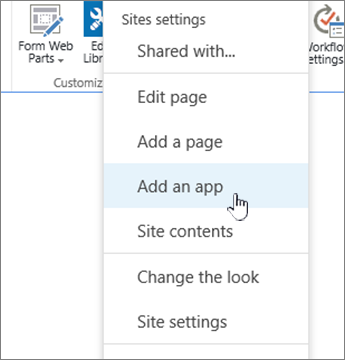
Click Settings
 and then click Add an app.
-
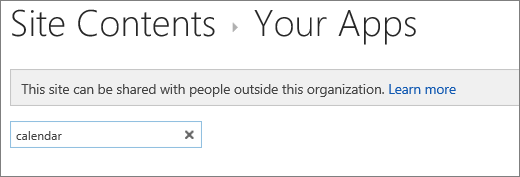
Type the type of list template you want (custom, task, calendar, etc.) into the search box, and click Search
 .
. 
-
Click the List template app you want use.

-
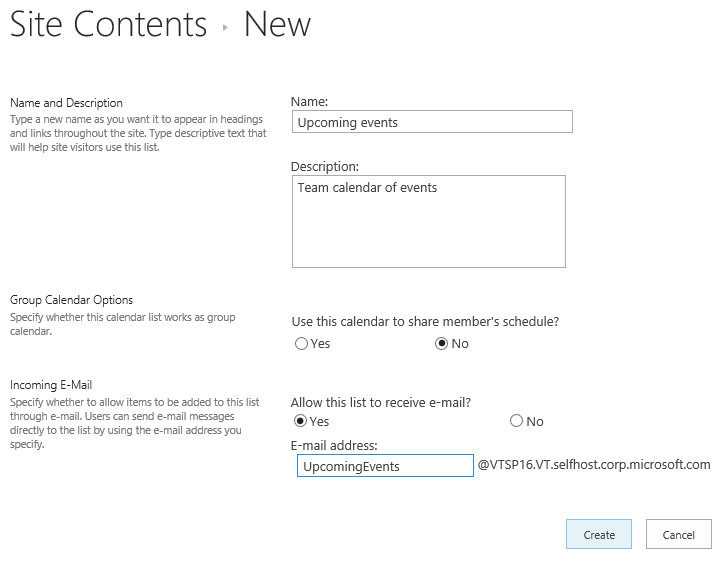
Type in a Name (required).
The name appears at the top of the list in most views, becomes part of the web address for the list page, and appears in site navigation to help users find the list. You can change the name of a list, but the web address will remain the same.
You can also click Advanced Options. Advanced Options lets you put an optional Description and additional information, depending on the particular list app.
-
Click OK.
Add a list to a page in SharePoint Server 2016 or SharePoint Server 2013
-
On the page that you want to add the list or library, click Page and then click Edit. If you don't see the Page tab, click settings
 , and then click Edit Page.
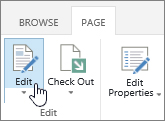
Note: If the Edit command is disabled or doesn't appear, you might not have permission to edit the page.
-
Click the place on the page where you want to display the list or library, and click Insert and then click App Part.
-
Select the App Part for the list or library and then click Add. You should see any lists you created in Add apps.
-
When you're finished editing the page, click the Page tab, and click Save. In some cases, you have the option to Save as Draft or Save and Publish.
Important: Some pages can't be edited, such as the Site Contents page.
Here's an example of a list that was added to a page by using the previous steps.
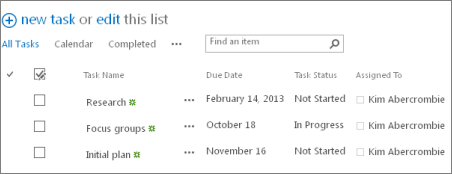
Minimize or restore a list or library on a SharePoint Server 2016 or SharePoint Server 2013 page
-
On the page where you want to minimize or restore the list or library, click Page and then click Edit.

-
Point to the list or library, click the down arrow, click Minimize or Restore depending on the current position of the list or library and then click OK.
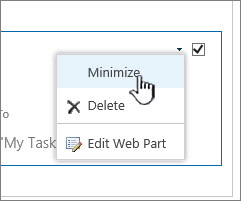
-
When you're finished editing the page, click Save. In some cases, you have the option to Save as Draft or Save and Publish.
Create a list in SharePoint Server 2010
You can create a list that you can later use in your pages. SharePoint Server 2010 includes many kinds of list templates, such as calendar, survey, and tasks.
-
Click Site Actions
 , click View All Site Content, and then click Create
  .
.Note: A SharePoint site can be significantly modified. If you cannot locate an option, such as a command, button, or link, contact your administrator.
-
Click one of the categories, such as Communications or Tracking and choose from there.
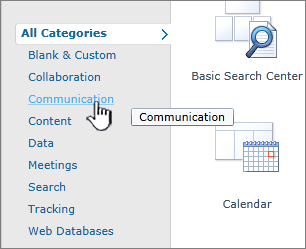
You can also enter the type of list template that you want to create in the Search Installed Items box, such as Contacts or Calendar and click Search
 .
. -
Type the Name for the list. Name is required.
The name appears at the top of the list in most views, becomes part of the web address for the list page, and appears in site navigation to help users find the list. You can change the name of a list, but the web address will remain the same.
-
Optionally you can click Advanced Options, and type the Description for the list and set other options. .
The description appears underneath the name in most views. Some kinds of lists can receive content by e-mail. If you plan to enable the list to receive content by e-mail, you can add the e-mail address of the list to its description so that people can easily find the e-mail address. You can change the description for a list.
-
To add a link to the Quick Launch panel, verify that Yes is selected in the Navigation section.
-
If there is an E-mail section, your administrator has enabled lists on your site to receive content by e-mail. To enable people to add content to this list by sending e-mail, click Yes under Enable this list to receive e-mail. Then, in the Email address box, type the first part of the address that you want people to use for the list. This option is not available for all kinds of list.
-
Fill in any other options, such as specifying whether a calendar works as a group calendar in the Calendar app.
-
Click Create.
Create a list on a page in SharePoint Server 2010
With SharePoint Server 2010 you can create lists from the pages that you are editing. This helps you more efficiently and effectively create the pages and the lists that you need.
-
From a page, click the Edit tab, and then click the Edit command.
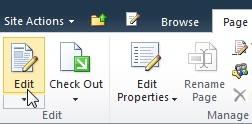
Note: If the edit command is disabled, you may not have the permissions to edit the page, contact your administrator.
-
Click on the page where you want to add a new list, click the Insert tab, and then click New List.

Note: If you don't see the Edit tab or New List is disabled, you may not have the permissions that are needed to create a list; contact your administrator.
-
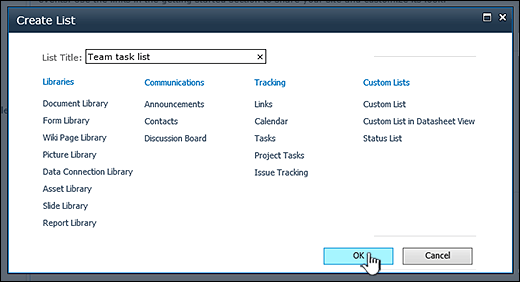
In the Create List dialog, type the List Tile, select the type of list that you want to create, and then click OK.
Create a custom list in SharePoint Server 2010
Creating a custom list resembles creating lists from a template, except that the custom list is created with only three columns: Title, Created By, and Modified By. After you create a custom list, you can add columns and make other changes to the list to meet your needs.
-
Click Site Actions
 , click View All Site Content, and then click Create
  .
.Note: A SharePoint site can be significantly modified. If you cannot locate an option, such as a command, button, or link, contact your administrator.
-
Under Custom Lists, click Custom List or Custom List in Datasheet View.
Notes:
-
Use custom list when you primarily want to use a form to enter and view data in the list.
-
Use custom list in datasheet view when you primarily want to use a grid, similar to a spreadsheet, to enter and view data in the list. This is helpful when you have several items to update at the same time.
-
You can change how you enter and display data in a list after a list is created.
-
-
Type the Name for the list. Name is required.
The name appears at the top of the list in most views, becomes part of the web address for the list page, and appears in site navigation to help users find the list. You can change the name of a list, but the web address will remain the same.
-
Type the Description for the list. Description is optional.
The description appears underneath the name in most views. Some kinds of lists can receive content by e-mail. If you plan to enable the list to receive content by e-mail, you can add the e-mail address of the list to its description so that people can easily find the e-mail address. You can change the description for a list.
-
To add a link to the Quick Launch, verify that Yes is selected in the Navigation section.
-
If there is an E-mail section, your administrator has enabled lists on your site to receive content by e-mail. To enable people to add content to this list by sending e-mail, click Yes under Enable this list to receive e-mail. Then, in the Email address box, type the first part of the address that you want people to use for the list. This option is not available for all kinds of list.
-
Click Create.
Add a list to a page in SharePoint Server 2010
-
On the page that you want to add the list or library, click Page and then click Edit. If you don't see the Page tab, click Settings
 , and then click Edit Page.
Note: If the Edit command is disabled or doesn't appear, you probably don't have permission to edit the page.
-
Click the place on the page where you want to display the list or library, and click Insert and then click App Part.
-
Select the App Part for the list or library and then click Add.
-
When you're finished editing the page, click Save. In some cases, you have the option to Save as Draft or Save and Publish.
Here's an example of a list that was added to a page by using the previous steps.

Create a list from a list template in SharePoint Server 2007
SharePoint Server 2007 includes several different types of list templates, ranging from a calendar to a contacts list. Although some of the settings vary among the lists, you can use the same basic procedure to create any type of list.
Note: To create a list, you must have permission to change the site where you want to create the list.
-
Click View All Site Content, and then click Create on the All Site Content page.
Tip: In most cases, you can use the Site Actions menu
 instead to complete this step.
 -
Under Communications or Tracking, click the type of list that you want, such as Contacts or Calendar.
Types of lists
The type of list that you use depends on the kind of information that you are sharing:
-
Announcements Use an announcements list to share news and status and to provide reminders. Announcements support enhanced formatting with images, hyperlinks, and formatted text.
-
Contacts Use a contacts list to store information about people or groups that you work with. If you are using an e-mail or contact management program that is compatible with SharePoint, you can view and update your contacts from your SharePoint site in the other program. For example, you can update a list of all your organization's suppliers from Office. A contacts list doesn't actually manage the members of your site, but it can be used to store and share contacts for your organization, such as a list of external vendors.
-
Discussion boards Use a discussion board to provide a central place to record and store team discussions that is similar to the format of newsgroups. If your administrator has enabled lists on your site to receive e-mail, discussion boards can store e-mail discussions from most common e-mail programs. For example, you can create a discussion board for your organization's new product release. If you are using an e-mail program that is compatible with SharePoint, you can view and update your discussion board while working in the other program.
-
Links Use a links list as a central location for links to the web, your company's intranet, and other resources. For example, you might create a list of links to your customers' websites.
-
Calendar Use a calendar for all of your team's events or for specific situations, such as company holidays. A calendar provides visual views, similar to a desk or wall calendar, of your team events, including meetings, social events, and all-day events. You can also track team milestones, such as deadlines or product release dates, that are not related to a specific time interval. If you are using an e-mail or calendar program that is compatible with SharePoint, you can view and update your calendar from your SharePoint site while working in the other program. For example, you can compare and update your calendar on the SharePoint site with dates from your Office Outlook calendar, by viewing both calendars side-by-side or overlaid with each other in Office Outlook.
-
Tasks Use a task list to track information about projects and other to-do events for your group. You can assign tasks to people, as well as track the status and percentage complete as the task moves toward completion. If you are using an e-mail or task management program that is compatible with SharePoint, you can view and update your tasks from your SharePoint site in your other program. For example, you can create a task list for your organization's budget process and then view and update it in Office Outlook along with your other tasks.
-
Project tasks To store information that is similar to a task list, but also provide a visual or Gantt view with progress bars, use a project task list. You can track the status and percentage complete as the task moves toward completion. If you are using an e-mail or task management program that is compatible with SharePoint, you can view and update your project tasks from your SharePoint site in your other program. For example, you can create a task list on your SharePoint site to identify and assign the work to create a training manual. Then you can track your organization's progress from Office Outlook.
-
Issue tracking Use an issue-tracking list to store information about specific issues, such as support issues, and track their progress. You can assign issues, categorize them, and relate issues to each other. For example, you can create an issue-tracking list to manage customer service problems and solutions. You can also comment on issues each time you edit them, creating a history of comments without altering the original description of the issue. For example, a customer service representative can record each step taken to resolve a problem and the results.
-
Survey To collect and compile feedback, such as an employee satisfaction survey or a quiz, use a survey. You can design your questions and answers in several different ways and see an overview of your feedback. If you have a spreadsheet or database program installed that is compatible with SharePoint such as Office Excel, you can export your results to further analyze them.
-
Custom Although you can customize any list, you can start with a custom list and then customize just the settings that you specify. You can also create a list that is based on a spreadsheet, if you have a spreadsheet program that is compatible with SharePoint. For example, you can import a list from Office Excel that you created to store and manage contracts with vendors.
-
-
All lists require a name. In the Name box, type a name for the list.
The name appears at the top of the list in most views, becomes part of the web address for the list page, and appears in site navigation to help users find the list. You can change the name of a list, but the web address will remain the same.
-
In the Description box, type a description of the purpose of the list. The description is optional.
The description appears at the top of the list in most views, underneath the name of the list. Some types of lists can receive content by e-mail. If you plan to enable the list to receive content by e-mail, you can add the e-mail address of the list to its description, so that people can easily find the e-mail address.
-
To add a link to this list on the Quick Launch, click Yes in the Navigation section.
If an Incoming E-mail section appears, your administrator has enabled lists on your site to receive content by e-mail. To enable people to add content to the list by sending e-mail, click Yes under Enable this list to receive e-mail. Then, in the Email address box, type the first part of the address that you want people to use for the list.
This option may not be available for some types of lists.
-
If an E-Mail Notification section appears, your administrator has enabled lists on your site to send e-mail notifications when list items are assigned. To enable the list to send e-mail to people when an item is assigned to them, click Yes under Send e-mail when ownership is assigned?.
This option may not be available for some types of lists.
-
Click Create.
Note: By default, you can add content by sending e-mail to discussion boards, announcements, and calendar lists, if incoming e-mail is enabled on your site. Tasks, project tasks, and issue-tracking lists can send e-mail to people when items are assigned to them, if outgoing mail is enabled for the site. Other lists can be enabled by your administrator with a custom solution such as an e-mail handler.
Create a custom list in SharePoint Server 2007
Creating a custom list is similar to creating a default list, except that the custom list comes with only a few columns, such as Title. After you create a custom list, you can add columns to suit the purpose of your list.
Note: To create a list, you must have permission to change the site where you want to create the list.
-
Click View All Site Content, and then click Create on the All Site Content page.
Tip: In most cases, you can use the Site Actions menu
 instead to complete this step.
 -
Under Custom Lists, click Custom List.
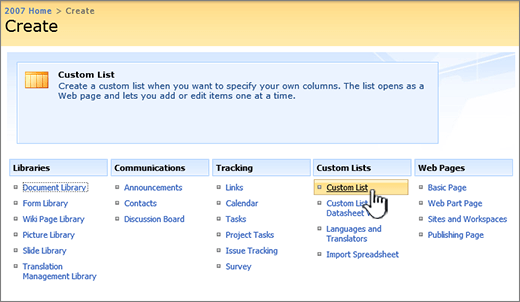
In the Name box, type a name for the list. The list name is required.
The name appears at the top of the list in most views, becomes part of the web address for the list page, and appears in site navigation to help users find the list. You can change the name of a list, but the web address will remain the same.
-
In the Description box, type a description of the purpose of the list. The description is optional.
The description appears at the top of the list, underneath the name of the list.
-
To add a link to this list on the Quick Launch, click Yes in the Navigation section.
-
Click Create.
To find out which version of SharePoint you're using, see Which version of SharePoint am I using?.
Create a list by importing a spreadsheet
You can save time creating a list by importing a spreadsheet that has the columns and data that you want for the list. Importing a spreadsheet is also a way to create a list without the default Title column. For more info, see Create a list based on a spreadsheet.
Saving a custom list template
If you've created a list format that you'd like to reuse, then you can save it as a list template. A list template can be uploaded to the apps selection in SharePoint from which you can create new lists. For more info on saving list templates, see Manage list templates.
Want to do the same with Libraries?
To create a library, see Create a document library in SharePoint
To delete a library, see Delete a document library in SharePoint
Next steps with Lists
Columns You can configure what type of data a list contains by adding and deleting columns. For more info, see Create a column in a SharePoint list or library.
Views You can configure how the data in a list is displayed by creating views.
-
Create, change, or delete a view of a SharePoint 2013 or 2016 list or library
-
Create, modify, or delete a view of a SharePoint 2010 list or library
Permissions You can configure who can access a list and what they can do with list data by configuring permissions.
-
Edit permissions for a list or library for SharePoint Online, SharePoint 2016, or SharePoint 2013
-
Edit permissions for a list, library, or individual item for SharePoint 2010
-
Manage permissions for a SharePoint 2007 list, library, folder, document, or list item
Recycle Bin You may be able to recover a deleted list from the recycle bin.
Leave us a comment
Was this article helpful? If so, please let us know at the bottom of this page. If it wasn't helpful, let us know what was confusing or missing. Please include your SharePoint, OS, and browser versions you're using. We'll use your feedback to double-check the facts, add info, and update this article.


COMMENTS