Tips for mailing lists No matter how clever your mailing is, it will have little impact if you send it to the wrong...
Tips for mailing lists
No matter how clever your mailing is, it will have little impact if you send it to the wrong people. You can limit your mailing list to names and addresses, or you can include more details about each customer so that you can categorize the customers into segments that make sense for your business.
The more you target your mailing at a customer segment that is likely to be interested in a specific offer, the greater your mailing's rate of success. Plan on devoting between a third and a half of your mailing campaign's time and budget to refining your mailing list for targeting appropriate customer segments.
In this article
How to use customer data
After you obtain information about your customers and potential customers, tracking the attributes that they have in common can be very useful. The more detail that you capture in your mailing list, the more options you have for targeting your mailings.
But make sure that the detailed data that you track is the data that you will use. The more complexity you add to your mailing list, the more work you must do to maintain your list.
For example, you might use customer data in any of the following ways:
-
Print mailing labels Create mailing labels, for which you need only name and address information.
-
Mail to customers in a specific locale Filter your mailing list by city or postal code, so that you can easily announce a promotion only to customers who live in a certain location.
-
Add a personalized greeting Personalize a mailing by including the recipients' first or last names in a greeting line by separating the name into title, first name, and last name data fields.
-
Focus on recipients of a certain age Notify customers of products or services that are appropriate for those customers' stage of life (such as planning for retirement in their twenties versus planning for retirement in their fifties) by collecting the birth dates of your customers as birth year (such as "1945").
If you want to offer a promotional gift to all customers whose birthday falls in the current month, you can collect their birth dates as month, day, year (such as "January 1, 2000").
-
Tailor separate mailings by gender Announce a new product line to only men or only women by including each customer's gender ("male" or "female") in your mailing list.
-
Use purchase history Send special announcements to those who have made recent major purchases, or notify customers when you have new models of their favorite brands. To do this, you need to track customers' purchase history. You can also can notify customers about similar products ("Customers who bought what you bought also bought this").
-
Send e-mail to save on postage Save on mailing costs for an invitation-only event by sending e-mail invitations to those customers who provide their e-mail addresses. You can first address your print invitations by performing a mail merge and filtering on customers who do not have e-mail addresses. Then you can create an e-mail invitation by performing an e-mail merge and filtering on those customers who have e-mail addresses.
Create a mailing list
At its most basic, a mailing list is a text file that separates recipient records into common fields. Such lists usually take the form of worksheets or tables, with each record in its own row, separated into columns that contain the individual data fields, like the basic mailing list pictured here.
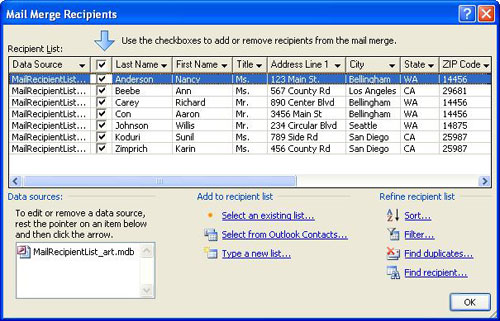
A complex list might include additional data fields, such as product size and color preferences, purchase history, birth date, and gender.
If you're creating a mailing list for the first time, you can do it without leaving Microsoft Office Publisher.
Create a mailing list
-
Open a publication.
-
On the Tools menu, point to Mailings and Catalogs, and then click Create Address List.
-
Before you begin to type information for your list, you can customize fields by adding, removing, renaming, or reordering fields that appear in the New Address List dialog box.
How?
-
Click Customize Columns, and then do any of the following:
-
To add a field, click Add. In the Add Field dialog box, type a name for your new field, and then click OK.
-
To remove a field, select the field under Field Names, click Delete, and then click Yes.
-
To rename a field, select the field under Field Names, and then click Rename. In the Rename Field dialog box, type a new name in the To box, and then click OK.
-
To change the order of the fields, select the field that you want to move, and then click Move Up or Move Down until it is where you want it.
-
-
Repeat these steps until you finish revising the list of field names, and then click OK.
-
-
In the New Address List dialog box, type the information for the first entry in the relevant fields (Title, First Name, Last Name, and so on).
-
When you finish entering information for the first entry, click New Entry or press TAB.
-
Repeat steps 3 and 4 until you have finished adding entries.
-
Click OK.
-
In the Save Address List dialog box, type a name for your address list in the File name box.
By default, the address list is saved in the My Data Sources folder. It is best to keep the address list here, because this is the default folder in which Microsoft Publisher looks for data sources.
-
Click Save.
Combine lists from multiple sources
Whether you have mailing lists or you purchase them, Publisher makes it easy to combine and edit customer lists from multiple sources in Publisher. You can choose what works best for you by assembling your Publisher mailing list from any combination of other lists created in the following programs:
-
Microsoft Office Excel
-
Microsoft Office Outlook
-
Microsoft Office Outlook with Business Contact Manager
-
Microsoft Office Access
You can also use lists that you purchase, such as those from Microsoft List Builder.
Specify the list to add
-
On the Tools menu, click Mailings and Catalogs, and then click Mail Merge to open the Mail Merge task pane.
If the publication is connected to a recipient list, verify the connection, and then click Edit recipient list in the Mail Merge task pane. If the publication is not connected to an existing recipient list, click one of the options under Create a recipient list, click Next: Create or connect to a recipient list, and then select the list that you want.
-
In the Mail Merge Recipients dialog box, under Add to recipient list, do any of the following:
-
Click Select an existing list, select a data source in the Select Data Source dialog box, and then click Open.
-
Click Select from Outlook Contacts (if you are prompted to choose a mail profile, click the profile that you want), and then click OK. Select a folder or distribution list in the Select Contacts dialog box, and then click OK.
-
Click Type a new list, add the entries that you want in the New Address List dialog box, and then click OK.
-
Resolve discrepancies when combining lists
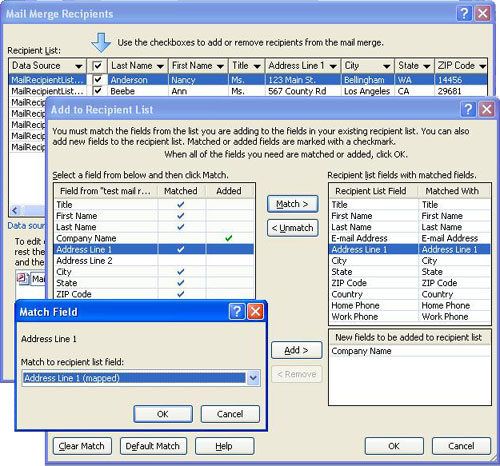
When you add one mailing list to another, one or more fields in the added list may not have a match in the existing list. For example, the address list that you are adding may include a Company Name field, but the original list may not.
Publisher prompts you to fix mismatches between fields in the various source lists by opening the Add to Recipient List dialog box.
-
In the Add to Recipient List dialog box, select a field that is not checked in the Matched column, select the field to which you want it to correspond in the Recipient list fields with matched fields list, and then click Match.
-
In the Match Field dialog box, verify that the field that you selected is listed under Match to recipient list field or select another, and then click OK.
-
If you need to add a new field to your recipient list to make a match, select the field that you want to add in the new list (the left list in the Add to Recipient List dialog box), click Add, and then click OK. Added fields are shown under New fields to be added to recipient list.
Tip: Remove an added field by selecting it in the New fields to be added to recipient list box, and then clicking Remove.
How do I match fields when Publisher doesn't prompt me to?
-
In the Mail Merge task pane, under More items, click Address fields, and then click Match Fields.
Save a shortcut to a combined list
You can create a shortcut to the combined list for use in other mailings. Whenever you edit an individual entry in the combined list, the edited entry also updates in the original source file if that file is available for editing. If you don't want to update the original source file, export the recipient list to a new file.
-
In the Mail Merge task pane (Step 3: Create merged publications), under Prepare to follow up on this mailing, click Save a shortcut to recipient list.
-
In the File Save dialog box, type a name for your combined address list in the File name box.
By default, the address list is saved in the My Data Sources folder. It is best to keep the address list here, because this is the default folder in which Microsoft Office Publisher looks for data sources.
-
Click Save.
Refine a recipient list
When the fields in the various source lists match, all of the records appear in the existing list in the Mail Merge Recipients dialog box, where you can filter, sort, and select the recipients to include in the e-mail merge. Select the check box next to each recipient that you want to include, and clear the check box next to each recipient that you want to exclude.
Select or clear all items
-
Select or clear the check box in the heading row.
Filter items in the list
If you want to use only certain entries in your list, you can filter the list by a specific field or criterion. After you filter the list, you can use the check boxes to include and exclude records.
-
Click the arrow next to the column heading of the item that you want to filter by.
-
Do one of the following:
-
Click (Blanks) to display all of the records in which the corresponding field is blank.
-
Click (Nonblanks) to display all of the records in which the corresponding field contains information.
-
Click (Advanced) to open the Filter and Sort dialog box, which you can use to filter on multiple criteria.
Note: You can also open the Filter and Sort dialog box by clicking Filter under Refine recipient list in the Mail Merge Recipients dialog box.
-
-
Tip: If your data source contains records that share the same information, and there are 10 or fewer unique values in the column, you can filter by specific information. For example, if there are multiple addresses that list Australia as the country or region, you can filter on Australia.
-
The Mail Merge Recipients dialog box displays only the designated records. To display all of the records again, click (All).
Sort items in the list
If you want to see items in alphabetical order, you can sort the items in your list.
-
In the Mail Merge Recipients dialog box, click the column heading of the item that you want to sort by.
For example, if you want to display the list alphabetically by last name, click the Last Name column heading.
-
To sort by using multiple criteria, click Sort under Refine recipient list. In the Filter and Sort dialog box, select the criteria that you want to sort by.
Find duplicates
To prevent duplicate mailings, you can find and eliminate records in your combined list for which most (but not necessarily all) fields match.
-
In the Mail Merge Recipients dialog box, click Find duplicates.
-
In the Find Duplicates dialog box, leave checked only those entries that you want to include, and then click OK.
Find a specific recipient or group of recipients that share a common attribute
To identify an individual or group of individuals that share common attributes (such as a last name, postal code, or birth month), you can search the list.
-
In the Mail Merge Recipients dialog box, click Find recipient.
-
In the Find Entry dialog box, enter the attribute that you want to find in the Find text box, specify the field or fields that you want to search, and then click Find Next.


COMMENTS