Manage Access database objects in the Navigation Pane Tip: Press F11 to display or hide the Navigation Pane...
Manage Access database objects in the Navigation Pane
Tip: Press F11 to display or hide the Navigation Pane.
All the objects in an Access desktop database are listed in the Navigation Pane, a feature first introduced in Access 2007. The Database window of earlier Access versions is not available.
You can customize the categories and groups of objects in the Navigation Pane. You can also hide objects, groups, or even the entire Navigation Pane. Access provides several categories that you can use right away, and you can also create custom categories and groups.
Note: The Navigation Pane is not available when you use an Access web app or a web database in a browser. Although you can use the Navigation Pane in an Access web app opened in Access, it has a limited feature set: display, sort, and search for database objects.
In this article
Overview
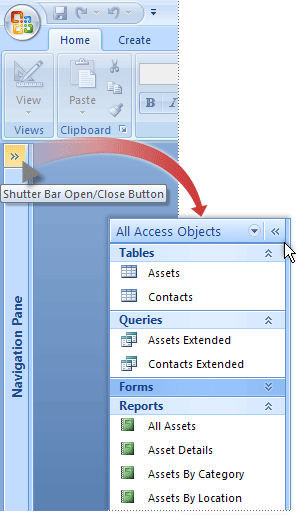
The Navigation Pane is the primary means by which you view and access all your database objects. When you open a database in Access, by default the Navigation Pane appears along the left side of the workspace.
Adjusting the Navigation Pane
You can adjust the appearance of the Navigation Pane in the following ways:
| To | Do this |
| Change the width of the Navigation Pane | Position the pointer over the right edge of the Navigation Pane and then, when it changes to a double-sided arrow, drag the edge to increase or decrease the width. |
| Open and close the Navigation Pane | Click the Shutter Bar Open/Close Button |

Using database objects in the Navigation Pane
You can use any object in the Navigation Pane by double-clicking it. If you right-click an object, you see a shortcut menu that lets you do a variety of things, such as opening an object in Design view.
Categories and groups in the Navigation Pane
You can organize the objects in a database into groups and categories. Groups let you arrange and associate the objects in the Navigation Pane and categories let you arrange and associate the groups.

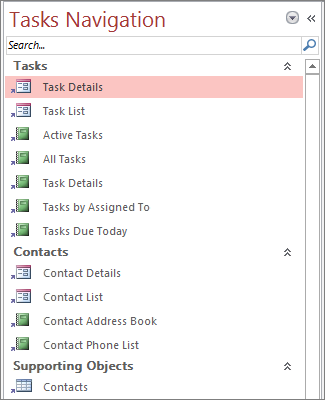
For example, in the preceding figure, Tasks Navigation is the category, and Tasks, Contacts, and Supporting Objects are the groups.
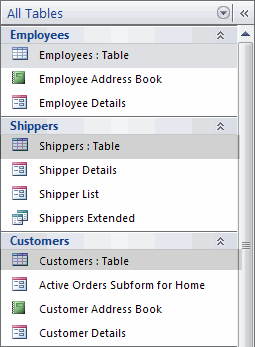
When you select a category, the items are arranged into the groups that the category contains. For example, if you choose the Tables and Related Views category, the items are arranged into one group per table, with each group containing shortcuts to all the objects that use the table — queries, forms, reports, and so on. If an object uses more than one table, it appears in all relevant groups.
Select a category in the Navigation Pane
When you create a new database, the category displayed by default is Tables and Related Views, and the group is All Tables. Every database also has a category named Custom that you can use to create a custom view of your objects. In addition, Access provides two more predefined categories that you can select, according to the way in which you want the objects to be displayed:
| Category | Description |
| Object Type | View all the objects in the database, sorted by their type. |
| Created Date and Modified Date | Locate objects that are created or modified on a specific date or in a date range. You can filter by Today or All Dates. These categories display objects in descending order from when they were created or last modified. |

Each predefined category includes a global group that contains all the objects in the database. You can easily locate the global group for a category by looking for the word All in front of the group name. For example, if you select the Tables and Related Views category, the global group is called All Tables.
Display and sort objects in the Navigation Pane
You can select the way in which the objects in the database are displayed in the Navigation Pane. For example, you can include the creation or modified dates, or display objects as icons or lists. By default, Access sorts the objects in the Navigation Pane by object type in ascending alphabetical order, but you can also change the sorting to suit your needs. To specify how objects are displayed and sorted, do the following:
-
Right-click the top of the Navigation Pane to display the shortcut menu, and then do any one of the following:
-
To change how the objects are displayed, point to View By, and then click either Details, Icon, or List.
-
To view all the groups in the database, click Show all groups.
-
To change the sort order of the Navigation Pane, point to Sort By and then select a sorting option.
-
To sort manually and customize the display order, click Sort By, and then click Remove Automatic Sorts.
-
Find objects in a database in the Navigation Pane
While you type text in the Search box, Access searches within the category for any groups that contain an object or object shortcut that matches your search term. Any groups that don't contain a match are collapsed.
Note: Access searches for objects only in the categories and groups that are currently displayed in the Navigation Pane.
Tip: To search the whole database for a specific object, select one of the predefined categories in the Navigation Pane, such as Tables and Related Views or Object Type. This helps make sure that all the groups are visible in the Navigation Pane.
Use the Search box to find database objects or shortcuts
-
If the Search box is not already visible at the top of the Navigation Pane, right-click the menu bar at the top of the Navigation Pane, and then click Search Bar.
-
Type either a part or the complete name of the object or shortcut in the Search Bar box.

While you type characters, Access searches and eliminates any group headings that don't contain a match.
-
To perform another search, click Clear Search String
 or press BACKSPACE to delete characters, and then type the new text for which you want to search.
 Note: When you clear the Search Bar box, the Navigation Pane again displays all of the available objects.
Create and modify custom categories and groups in the Navigation Pane
Note: This section doesn't apply in an Access web app.
When you create a new database without using a template, by default the database contains a Custom category, which displays one group that contains all the objects that are defined in the database. You can rename the custom category, create more custom groups in it, and assign objects to those groups. The default sorting option for groups is All Tables.
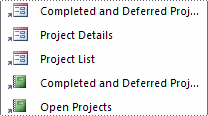
When you view custom categories and groups from the Navigation Pane, you always see the shortcuts to the objects. Shortcuts can be identified by a small arrow next to the lower-left corner of the object icon.

When you open a shortcut, you open the object it points to. However, if you delete a shortcut, Access doesn't delete the object in the database that the shortcut points to. You can also hide and rename shortcuts without changing the data that the shortcuts point to in the database.
One way to customize the objects in a database is by creating custom categories. For example, you can create a custom category when you want to create a form with specific types of buttons or links that you can use to navigate the database. When you create a custom category, it applies to the current database only. You cannot transfer custom categories and groups to other databases. You can create a custom category by either renaming the default Custom category that Access provides or by creating a new custom category. Limiting the number of custom categories and groups in your database can make it easier to locate data.
Note: Although you can remove objects from a custom category or group, you cannot remove objects from a predefined category or group.
Use the Navigation Options dialog box to create and manage custom categories and groups. The dialog box displays a list of all the categories that have been defined in the database, and shows the groups for a selected category.
Create a custom category
When you create a new custom category, groups named Unassigned Objects and Custom Group 1 are created for that category. By default, Access doesn't put any objects in the Unassigned Objects group. Instead, all the objects in a category that aren't in a group are displayed in the Unassigned Objects group in the Navigation Pane.
-
To create a new category, right-click the menu at the top of the Navigation Pane, and then click Navigation Options.
-
Under Categories, click Add Item.
A new category appears under Categories in the Navigation Options dialog box.
-
Type a name for the new category, and then press ENTER.
Rename a custom category in the Navigation Pane
If an unused custom category is available, you can rename it instead of adding a new custom category.
-
To rename a custom category, right-click the menu at the top of the Navigation Pane, and then click Navigation Options.
-
Under Categories, click Custom, and then click Rename Item.
-
Type a new name for the category, and then press ENTER.
After you create or rename a custom category, you need to create custom groups under each custom category.
Access automatically creates a Custom Group 1 and an Unassigned Objects group under each new category. Objects that are not assigned to groups are automatically put in the Unassigned Objects group. You can either create a new custom group or rename the Custom Group 1 group to the name that you choose.
Create a custom group in the Navigation Pane
-
To create a new custom group, right-click the menu at the top of the Navigation Pane, and then click Navigation Options.
-
Under Groups for category name, click Add Group.
-
Type a name for the new group, and then press ENTER.
Rename a custom group in the Navigation Pane
-
To rename a custom group, right-click the menu at the top of the Navigation Pane, and then click Navigation Options.
-
Under Groups for category name, click the custom group, and then click Rename Group.
-
Type a new name for the group, and then press ENTER.
After you have created a custom group in a custom category, you add or move objects, such as tables, into the custom group.
Add objects to a custom group in the Navigation Pane
Note: This section doesn't apply in an Access web app.
You can add objects to a custom group in several different ways, such as dragging an object to create a shortcut, copying and pasting, and importing objects from external sources. However, if you choose to cut an object from a group, be aware that this can cause problems. We do not recommend cutting an object because a database is a set of components that work together, and if an object is deleted from that set of components, it can break part or all of the functionality of the database.
-
To add or move objects in the database into a custom group, click the drop-down arrow at the top of the Navigation Pane, and then click the custom group that you created.
-
Under Unassigned Objects, right-click the object that you want to add or move.
-
Click Add to group on the shortcut menu, and then click the custom group that you want to add the object to.
Copy and paste objects
-
In the Navigation Pane, right-click the object that you want to copy, and then click Copy.
-
Right-click the group in the Navigation Pane where you want to paste the object, and then click Paste. You can also paste the object into the Navigation Pane of another open Access database.
Importing tables from other databases or data from other programs (such as text files and Microsoft Office Excel workbooks) is another way to add objects to your database. For more information about how to import external data, see the links in the See Also section of this article.
Remove and restore shortcuts in custom groups in the Navigation Pane
Note: This section doesn't apply in an Access web app.
When you view custom objects in the Navigation Pane, you are actually looking at shortcuts to those objects. An object icon with a small arrow next to its lower-left corner indicates that it is a shortcut or pointer to the actual object.

If you remove or delete a shortcut from the Navigation Pane, you are only removing the pointer to that object and not removing the object from the database. When the shortcut of an object is removed from a custom group in the Navigation Pane, the reference to the object is removed from the custom group, and the object appears in the Unassigned Objects group in the Navigation Pane.
-
To remove a shortcut, right-click the object in the Navigation Pane, and then click Remove.
-
To restore the shortcut for the object, drag the object from the Unassigned Objects group in the Navigation Pane to the custom group.
Important: Although you can delete (that is, permanently remove) predefined and custom groups, we do not recommend doing this because it can cause problems in the database. Databases are sets of components that work together, and if an object is deleted from that set of components, it can break part or all the functionality of the database.
Hide objects and groups in the Navigation Pane
Note: This section doesn't apply in an Access web app.
Hiding an object or group can be a better option than deleting it when the object or group is not used or you want to restrict access to it. Hiding an object does not change the database, whereas deleting an object or group (even if it appears to be a duplicate) can break part or all of the functionality of the database.
To hide an object or group in the Navigation Pane, do one of the following:
-
To hide an object, right-click the object, and then click Hide in this Group.
-
To hide an entire group, right-click the group, and then click Hide.
To hide an object or group that appears dimmed in the Navigation Pane, do the following:
-
Right-click the menu bar at the top of the Navigation Pane, and then click Navigation Options.
-
In the Navigation Options dialog box, clear the Show Hidden Objects check box, and then click OK.
Unhide objects and groups in the Navigation Pane
Note: This section doesn't apply in an Access web app.
To display hidden objects or groups without providing access to them, do the following:
-
Right-click the menu bar at the top of the Navigation Pane, and then click Navigation Options.
-
In the Navigation Options dialog box, select the Show Hidden Objects check box, and then click OK.
If the hidden objects and groups appear dimmed in the Navigation Pane, they are not enabled. To make these dimmed objects or groups available from the Navigation Pane, do the following:
-
To enable an object, right-click the object, and then click Unhide in this Group.
-
To unhide a group, right-click the group, and then click Unhide.
 or press F11 to open and close the Navigation Pane.


COMMENTS